Thursday, April 24, 2014

Elizabeth Andrews Armbinder Gallery...

Elizabeth Andrews and her husband David have been putting my armbinder to good use, I see. She was kind enough to send over a gallery of images, and is giving me some great feedback from the field. I'm always looking for ways to improve the fit or function of a restraint. 

The fetishist in me particularly loved the set with the armbinder used in conjunction with ballet boots and head harness in a pretty extreme hogtie. It's just a beautiful shot...

 
Whew, did it get hot in here all of a sudden? 


 Here we have David again, doing all the hard work of tying up these beautiful girls (poor guy...). 


And Elizabeth, doing the best she can to break free from her sleek black pocket of pure strappy love bondage. 


Thanks to Elizabeth and David, for sharing the images! More of their work can be found here. And here

Friday, April 18, 2014

Kat Hooded by Karen Hsiao


Karen Hsiao continues to send me images from time to time she made using my hoods, and I have to say this one really took my breath away. The beautiful Asian face in profile, with red lips and braided hair. Another dream image, made real. 

We have a new project in the works, possibly even more massive than Black Cherries. I can't give too much away, but it's dark, and it's sensual, and it's beautiful. I can't wait to dive back in...

Wednesday, April 16, 2014

Fetishcraft book by John Huxley

I recently received a beautiful book by John Huxley titled: Fetishcraft. It's the best book of its type that I've ever seen: a great primer on making your own custom fetish gear in leather. 

Mr. Huxley starts out talking about the tools you will need for production, and if you've been reading this blog for a while much of this will look familiar. I agree wholeheartedly with his statement: "When the fit should be precise, as is generally the case with fetishwear, making ones own garments is ideal."
I really like that it's more than just a how-to manual. The chapters begin with the author discussing different aspects of fetishism and the BD/SM sexual experience - almost a philosophical overview that frames the projects.  

Production processes and techniques are spelled out clearly. The level of detail and the variety of projects makes this book a treasure trove of information. 


Each project comes with a measured drawing, into which you can plug your own measurements for a custom-fit. Some unusual garments are covered, such as robes...
...and even zentai suits made of spandex. 

There are patterns and tips for making bondage-style hoods in leather. 

(I always love seeing how different people approach the problem of making a tight-fitting leather envelope for the human head out of what is essentially a flat material.) Many of the projects covered in the book could be adapted for latex construction as well. 
Lots of creative ideas to get your mind going when it comes to customizing your designs to make them truly your own. 
Some of the projects are more simple, like the fist mitts,
a ball gag, 
harnesses, 
and a cock sheath! 
There are some pretty complex projects here as well, including a very thorough description for making weighted, plaited floggers - from cutting the strips of leather you'll need, to the turks-head knot used to finish the end of the handle. 
  
Overall, I'd highly recommend this book for anyone interested in leathercraft, making their own gear, or even making things for others. It's detailed, thorough and organized, offers a comprehensive overview of tools, equipment and techniques. 

Available at Amazon, or check out the book's website here

Tuesday, April 15, 2014

Mummification of Nanako Aida

Another great movie now available from Reijoh-Shashinkan: "Mummification of Nanako Aida with Brown Tapes." I had been wanting to get this movie for a while, but only recently has it been made available as a download on Clips4Sale. For someone (like me) into total mummification, Asian girls in bondage, complete and total wraps (including the head!), and lots of wiggling around and rolling over by the girl slave once wrapped, it's right up my alley. 

Add in the ridiculous amount of tape over the mouth-filling gag (I think I counted 7 wraps *whew*), and you have a winner!  

The close-up feet wrapping doesn't hurt, either!
Feet getting wrapped... thoroughly!
 Thank you, Nanako for suffering so beautifully for us...
Lots of wiggling and rolling over. Very hot. 

The link to the Clips4Sale store HERE (you may have to search for "Nanako"). 

Sunday, April 13, 2014

Lew Rubens Project - Part II

So here's the final result of my collaboration with Lew Rubens. A 3-part set with hood, armbinder and posture collar. 
I started by making a wrap of my models hands together with openings for the thumb and fingers. I wanted to keep a bit of the hand pocket between the thumb and fingers so the armbinder wouldn't ride up. This feature really makes this armbinder unique, and the idea came from Lew. I don't think I've ever seen one like this before. 
 The line across the wrap indicates the wrist. 
The duct-tape wrap is cut apart, and used to mark the edits to my master pattern. A few parts get cut away. 

The end result: open-fingered armbinder nirvana.
The collar was based on my standard tall posture collar with a rolled edge and locking hasp (staple-plate) closure. 
But in order to make the straps removable, I riveted heavy rectangular loops to the lower edge. I tried to make these as sleek and low-profile as possible. 
It does make it so the collar could be used with or without the straps. 
And finally a beautiful nose-only hood in soft Italian lamb leather. 
This thing should fit like a glove...
Lew, I can't wait to see what you do with it! It's been a pleasure. 
Click to visit Lew's felife, homepage or storefront.


Lew Rubens Project - Part I

This blog has made it possible for me to meet some really great people, especially those working in the world of bondage. Some folks who really share a passion for bondage, and are working in the field making quality work commercially - who would probably still be doing it anyway if there were no money to be made at all. It's in their blood...

One of the strange occurrences is when one of these people actually reach out and contact me. A while ago this happened with Lew Rubens, who if you don't know is an incredibly talented producer of bondage imagery. I had seen his work before and was just blown away by the sheer quality of what he was making. His rigging, his ideas, and the photos he was creating are in the realm of the best work being produced today. He does the technically difficult: suspensions, underwater, complex and beautiful rope ties. His models and setups are sexy as hell too! 

So when he contacted me a while back, I knew we had to work together. Add to that he had an idea for a project that really got me going  intersected with my current obsession with armbinder patterns: An armbinder/hood/collar combo consisting of: A severe nose-only hood. *check* A strictly-laced tight-fitting armbinder (with a twist: make the hand opening so the model's fingers are free). *check* And finally, a tall posture collar to which the armbinder straps would connect to make it as clean-looking as possible. *check* And to top it all off: it would be nice if it could be made to fit Drea Morgan! Holy s***! Are you kidding me? 

He wasn't kidding...

So the sketches began. Initially we were talking about making the collar attach to the hood. But I dissuaded Lew from going that route. When you connect a heavier leather component to a lighter thinner leather, you can have a problem at the seam. 
 The open-handed innovation came completely from Lew. To me, a closed, fitted hand pocket is sexy as hell. I'm a fan of total enclosure, in case you haven't noticed. But the open-finger idea actually started to grow on me as the project progressed. It's one of those contrasting enclosure/exposure things that can add to the excitement of a piece. For me it's one of the coolest thing about working with others: finding new ways of looking at something or a new twist to enjoy. 
 The idea was to have a laced collar originally as well. But I was concerned that in the event that it had to be removed quickly, a staple plate may actually be quicker. 


That was it for the sketching. Lew approved, and we were ready to start working. 

UPDATE: this project has since been completed, and the photos of Drea bound in the gear by Lew Rubens can be seen here, here and here on FetLife. Thanks Lew! 

Armbinder Beauty Shots

Some photos of the recently-completed armbinder project. These are all based on the pattern I posted a few days ago. You can download it yourself here if you like. The first one I made for a friend with a matching blindfold: 

 This design is made straight from the pattern with no modifications. 
The second is modified a bit for a tighter fit in the arms: I can't wait to see this one on Fragile Slave! She is one of those talented and flexible individuals who can bring their elbows together behind her back so they touch. I love her so much - a truly passionate and devoted bondage slave. She is getting this along with a new hood! (Lucky girl...)

The third design is for my personal collection, and an experiment with a full-aniline hide. This time the pattern was edited to make it slightly tighter in the arm pocket. 
This uncorrected leather has a unique surface, and a beautiful deep rich color. It's called out as "burgundy" on the color chart, but has a purple/oxblood intensity that I really like. 


I always feel the need to try out different leathers myself to see how they handle, both when sewn and after being put through their paces. It's a tough job, but somebody has to do it...

Thursday, April 10, 2014

Make an Armbinder from the New Pattern!

The armbinder pictured above is made directly from the free pattern. 


Today I'm going to take you through the making of an armbinder using the pattern I posted a couple of days ago. The downloadable pattern can be found here

This pattern has all the pieces you'll need to build the armbinder, including all the fussy little bits: reinforcements, keeper loops and even a couple of templates to help you position your holes correctly. Just print it out at 100% (you'll probably have to tile the pieces together like I did), make any necessary adjustments, and you are ready to go.
I am actually making 3 armbinders at once, so don't be confused. I'm making one straight from the pattern, and 2 modified versions: slightly tighter and with tweaks to the size of the hand pocket. Your first step should be to make any necessary edits to the size of the pattern before you begin so it fits you (or your lucky slave).
The good news is all the little elements should remain the same size, even with different fit options for the sleeve itself. The one exception is the long straps. For anyone over 5'2" tall, you may need to make the straps a bit longer than the 29 inches called for in the pattern. I would always recommend making a test of the pattern before cutting leather. You can use vinyl or some people use denim or muslin. Better to find out on something cheap, rather than the expensive, beautiful hide you just (almost) wasted!

Step 1: Cut out all your parts. Below you can see the three sets of small parts cut out: one for each armbinder I'm making. 


Step two is to clip and sew along the first 4" of the hand pocket.
You don't want to stitch too far: on one side you need the opening for the laces, on the other we'll be inserting the D-ring. Start and stop at the marks indicated on the pattern.
Step 2: Glue in the reinforcement tabs (#5 on the pattern).
Cut reliefs, glue and fold down hand pocket stitching and along laced opening.
Use mallet to flatten.
Keep the transition from stitched to non-stitched part smooth.
Topstitch along laced opening 1/8" from edge. 
Glue, flatten and topstitch top edge of tongue.
(The folded edge on the tongue could be optional, but I think it looks neater that way.)
Use double-sided tape along the edge to hold the tongue in position while sewing. 
Peel off the backing and place the tongue in position:
I usually turn the piece over, and check for symmetry. Adjustments can be made at this point, to make sure it's just right before sewing. 
Now topstitch with a 1/2" gap for the lacing grommets (a stitching guide can come in handy here).
After sewing, remove double-sided tape and trim excess from tongue.
Now it's time to glue up all your straps.
I find it handy to use a 2" disposable brush to spread the glue on the strips.
Wait for the glue to set up (about 5 minutes)...
...then fold all of your strips to create your straps. 
You could always use vegetable-tanned leather belts, or whatever else you like for your straps. I tend to like having the straps and keeper loops all made from the same hide so the color and texture matches perfectly. Plus, straps made like this are soft and slightly stretchy, which makes the armbinder feel a bit more comfortable when you are wearing it.

You can also glue up the straps for the D-ring. 
I reinforce these with strips of nylon webbing.
These get glued together, ready for sewing into the end of the hand pocket.
You insert the D-ring facing in...
...then fold the pocket up...
...and clip together for sewing. Not shown: I usually trim off that bit of tab extending beyond the edge of the seam allowance, so a binder clip can hold the D-ring in place.
Now, sew up the rear seam of the armbinder.
Run an additional line or two of stitches to reinforce the D-ring connection.
Now cut reliefs, glue up and flatten the rear seam.
Glue in the tabs for the rear-seam reinforcement (#9 on the pattern).
Here are the reinforcement tabs:
Glued in position:
Time to finish the belts. Trim to length, using a 1" rounded strap-end punch.
Each long strap (pattern #3) gets paired with a long strap reinforcement (pattern #6).
Sew these in place.


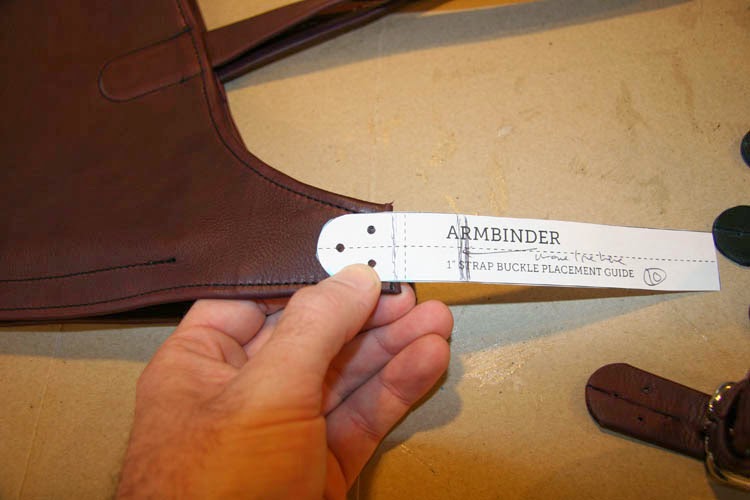
Time to work on the buckle-end straps (pattern #4). I put a little template into the pattern (#11) to help you position the holes correctly on these straps. 
Use a 1" strap end punch to round the corners and cut the straps to length. 
Use a .625" slot cutter (also called an oblong punch or bag punch) for the slots.
And a 1/8" hole punch comes in handy for the pilot holes to attach the buckles with rivets.
Next we fold down the seam along the top edge of the armbinder. 
Cut away the corners from the seam allowance.
Cut reliefs in the curved seam allowance to allow it to lay flat, and fold it over. 
Last, fold down the top tab. 
Now you have the top edge folded down. But before we topstitch, we're going to sew the long straps in first. 
I use the double-sided tape to hold the long straps in position. 
Align with the marks from the pattern. 
Now topstitch the long-strap tab in place, following the D-shaped contour of the strap. Finally, topstitch along the top edge (and across the strap). 
It should look like this when you're done:
An inside view:
The stitching should come around and meet up with the lacing opening stitches we did earlier. 
Now it's time to work on the buckles. First, cut the keeper loops to size. For this thickness of leather (1.3mm), 3.125 inches long is just about right. 
I use a staple gun to close the loops. 
Wrap 'em around the wood wedge. 
Staple them across the gap. 
Then pry them off, and turn down the prongs to hold the loop closed. 
We have all the buckle-end parts ready to go: straps, buckles and keepers. 
Use the template to mark and punch pilot holes in the armbinder tab. 
I use short nails to keep the belt in position on the tab while I set the rivets to hold it in place. 
The buckle straddles the tab (one leg on either side). 

I use the "little wonder" riveter from Weaver to set the 5/16" cap rivets. 
 
You could use jiffy rivets, or even sew this connection if you don't have the tools to set rivets. Just punch 4 holes and used waxed thread. 
Use the pattern to mark the location of the grommet holes. 
I punch 3/16" holes to fit the size #00 Osborne grommets. 
Once the rivets are set, time to lace her up. It takes about 92 inches of lacing. 
I like making the X pattern with the laces. 
And that brings us to the end... Congratulations on your new armbinder(s)! 

Once again, the pattern is here if you want to give it a try... Good luck!